Visual Editor
Reference for the loom-ui visual editor.
Starting the Editor
# Open a pipeline
loom-ui pipeline.yml

# Browse pipelines in a directory
loom-ui experiments/

# Create a new pipeline
loom-ui --new

# Custom port
loom-ui pipeline.yml --port 8080
User Interface
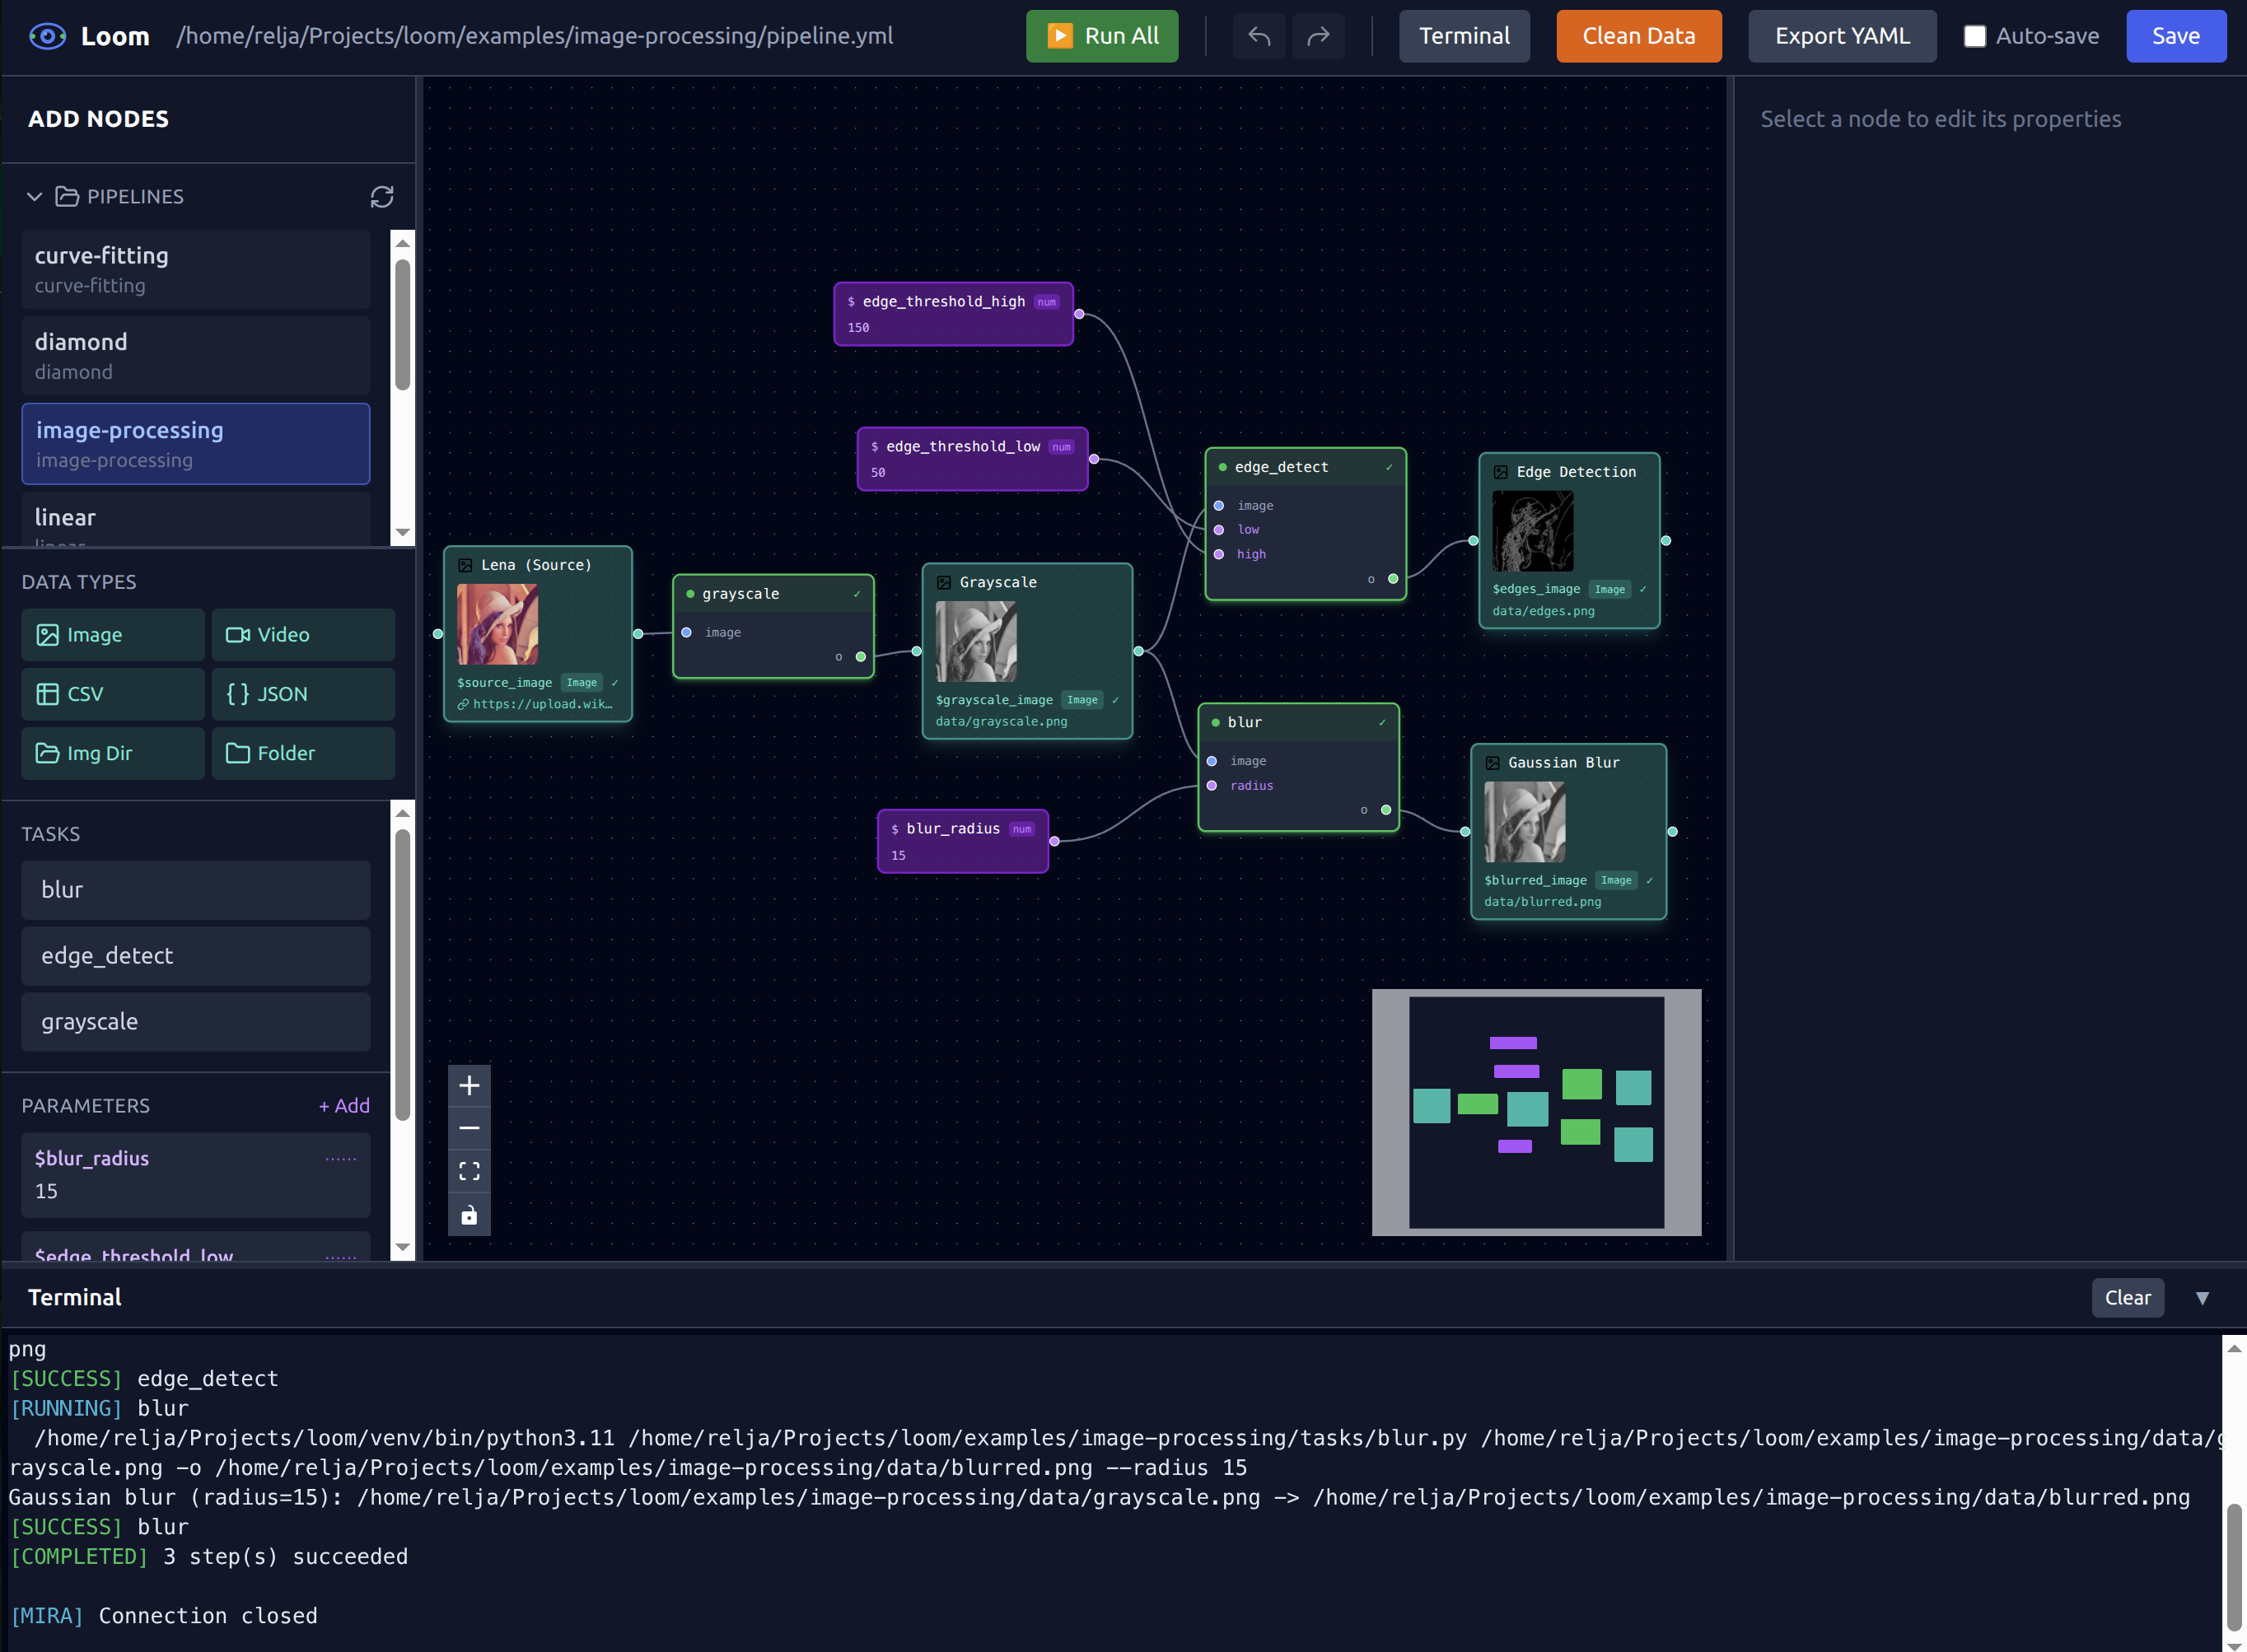
The editor has four main areas:
- Toolbar (top) — Logo, file path, run controls, save button
- Sidebar (left) — Add data nodes, browse tasks, manage parameters
- Canvas (center) — Visual graph of your pipeline
- Properties Panel (right) — Edit selected node, run individual steps
- Terminal Panel (bottom, collapsible) — Execution output
Panels
Sidebar (Left)
- Data Types — Add new data nodes to the canvas
- Tasks — Click to add task steps to the canvas
- Parameters — Add/edit configuration values
Canvas (Center)
- Visual graph of your pipeline
- Drag nodes to arrange
- Connect steps to data nodes by dragging from handles
- Multi-select with Shift+click or drag box
- Mini-map in corner for navigation
Properties Panel (Right)
- Edit selected node properties
- For steps: name, task, inputs, outputs, args
- For data nodes: display name, key, type, path, description
- Run/Cancel buttons for individual steps
- Shows available data/parameter references
Terminal Panel (Bottom)
- Collapsible output panel
- Live streaming execution output
- Per-step output tabs when running parallel
- ANSI color support
Node Types
Data Nodes
Represent file paths or URLs:
- Green = file exists on disk
- Grey = file doesn't exist yet
Step Nodes
Represent Python tasks:
- Solid border = regular step
- Dashed border = optional step
- Optional and disabled checkboxes in properties panel
- Shows execution state (idle, running, completed, failed)
Keyboard Shortcuts
| Shortcut | Action |
|---|---|
Cmd/Ctrl + Z |
Undo |
Cmd/Ctrl + Shift + Z |
Redo |
Ctrl + Y |
Redo (Windows) |
Cmd/Ctrl + S |
Save |
Cmd/Ctrl + C |
Copy selected nodes |
Cmd/Ctrl + V |
Paste nodes |
Delete / Backspace |
Delete selected |
Running Pipelines
Run Controls (Toolbar)
- Run All — Execute entire pipeline
- Stop — Cancel running execution
Run from Properties Panel
Select a step to access:
- Run This Step — Execute just this step
Run from Toolbar
- From Here — Execute from the selected step and all downstream
Execution States
| State | Indicator |
|---|---|
| Idle | Default appearance |
| Running | Animated border |
| Completed | Green checkmark |
| Failed | Red indicator |
Workspace Mode
Open a directory to browse multiple pipelines:
Features:
- Pipeline browser in sidebar
- Double-click to switch pipelines
- Prompts to save unsaved changes before switching
Connections
Creating Connections
- Hover over a node handle (small circle)
- Drag to another node's handle
- Release to create connection
Connection Rules
| From | To | Valid? |
|---|---|---|
| Data node → Step input | Yes | Main data flow |
| Step output → Data node | Yes | Step produces data |
| Parameter → Step arg | Yes | Config value |
| Data node → Data node | No | Not allowed |
| Directory data node output → empty canvas | Yes | Opens the file picker (see below) |
Nested Files (Drill Into a Directory)
A step often produces a whole directory, and a later step needs one specific file from inside it. To add such a file:
- Drag from the output handle of a directory data node (
data_folder/image_directory). - Release on empty canvas — a picker opens, listing every file in the directory with a fuzzy-search box (focused automatically).
- Type to filter, then click a file (or press Enter).
If you type a name that isn't in the directory, the picker offers to add it as a new expected file (marked assumed from output — unverified). Pressing Enter then asks for confirmation and warns that Loom cannot validate the connection, since it cannot know whether the producing step will create that file once it runs. The node is added anyway, so you can wire up the pipeline before the output exists.
The file is added as a data node nested in the directory: it records
nested_in: $directory and is drawn with a dashed ⊂ inside edge back to the
container. The nesting is explicit in the YAML, so the consuming step's
dependency on the producing step is tracked (see
Pipeline Schema → Nested Data).
Type Validation
When tasks have typed inputs/outputs, the editor validates that connected types match.
Saving
- Auto-save is disabled by default
- Unsaved changes shown with
*in title - Cmd/Ctrl + S to save manually
- Prompted to save when switching pipelines or closing
Tips
- Drag from handles to create connections
- Double-click data nodes to open the file path
- Shift+click to multi-select nodes
- Delete key removes selected nodes/connections
- Mini-map helps navigate large pipelines